Device | Schedules | Edit Schedule | Details
The Edit Schedules page is used to edit basic details, advanced features, and actions for the schedule you selected on the Schedules page. Notice that there are three tabs on the Edit Schedule page:
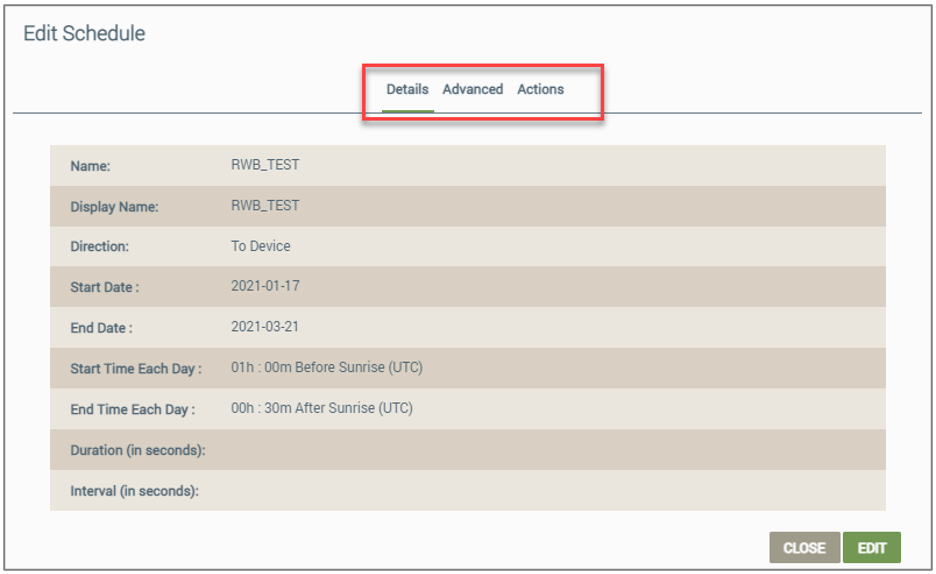
The Details tab displays first by default; below are instructions on how to edit the settings on this tab. For instructions on how to use the other tabs, click the following links:
Edit Settings on the Details Tab
- Click the EDIT button.
- For Name, change the name of the schedule, which must match schedule name on device host application.
- For Display Name, change to a different user-friendly screen name for the schedule.
- For Direction, select either of the following options from the drop-down list:
- To Device - if the schedule is sent to the device. Allows both the Ayla-enabled device and Third-Party Application API Client to update a given device property.
- From Device - if the schedule is sent from the device. Allows only the Ayla-enabled device to update a given device property.
- For Start Date (UTC), enter the date/time to to start the schedule.
- For End Date (UTC), enter the date/time to stop the schedule.
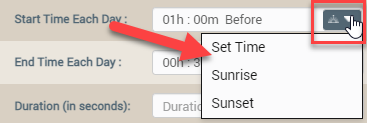
- For Start Time Each Day (UTC), click in the field and then use the arrows in the Select Time drop-down to enter the time the scheduled event should start each day that the schedule is active. Refer to the following example:

If you enabled the Sunrise/Sunset option for the template associated with this device, you can configure local sunrise or sunset settings, as shown and described below. You can enable the Sunrise/Sunset option in the Ayla Developer Portal; refer to the Ayla Developer Portal User's Guide on Ayla Docs for details and steps to enable this option.
- Click the drop-down menu at the end of the field to select the Sunrise or Sunset setting (as shown in the example above).
- After selecting Sunrise or Sunset, click in the Start Time Each Day field to open the settings for an offset time to run the schedule a specific number of hours/minutes before or after sunrise or sunset, as shown below:
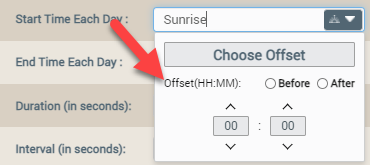
- Select Before or After to specify whether the time is either before or after sunrise/sunset.
- Use the up and down arrows to enter the hours and/or minutes before sunrise or sunset.
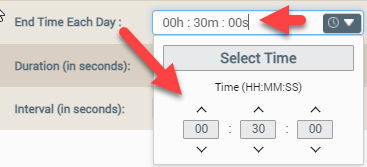
- For End Time Each Day (UTC), click in the field and then use the arrows in the Select Time drop-down to enter the time the scheduled event should end each day that the schedule is active. Refer to the following example:
If you enabled the Sunrise/Sunset option for the template associated with this device, you can configure local sunrise or sunset settings, as shown and described below. You can enable the Sunrise/Sunset option in the Ayla Developer Portal; refer to the Ayla Developer Portal User's Guide on Ayla Docs for details and steps to enable this option.
- Click the drop-down menu at the end of the field to select the Sunrise or Sunset setting (as shown in the example above).
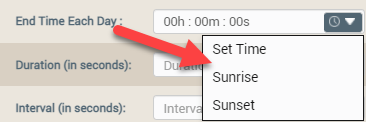
- After selecting Sunrise or Sunset, click in the End Time Each Day field to open the settings for an offset time to run the schedule a specific number of hours/minutes before or after sunrise or sunset, as shown below:
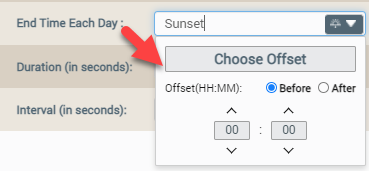
- Select Before or After to specify whether the time is either before or after sunrise/sunset.
- Use the up and down arrows to enter the hours and/or minutes before sunrise or sunset.
- For Duration (in seconds), use the up/down arrows to select the number of seconds that the schedule should be active.
- For Interval (in seconds), use the up/down arrows to select the number of seconds between consecutive schedule events.
- Click SAVE.
How to get here on the dashboard:
- Click Devices in the navigation panel, and then click the device in the table listing to open the Device page.
- Click SCHEDULES in the menu on the lower left side.
- Click the schedule you wish to edit.
Please click here to let us know how we're doing. Thank you.